

- 1-Understanding-The-Miter-Saw-And-Its-Functions
- 2-Preparing-Your-Work-Area-And-Tool-For-Angled-Cuts
- 3-Setting-The-Angle-And-Positioning-The-Material
- 4-Executing-Precise-Angled-Cuts-With-A-Miter-Saw
- 5-Safety-Considerations-And-Best-Practices
- 6-Tips-For-Maintaining-Your-Miter-Saw-And-Improving-Results
1. Understanding the Miter Saw and Its Functions
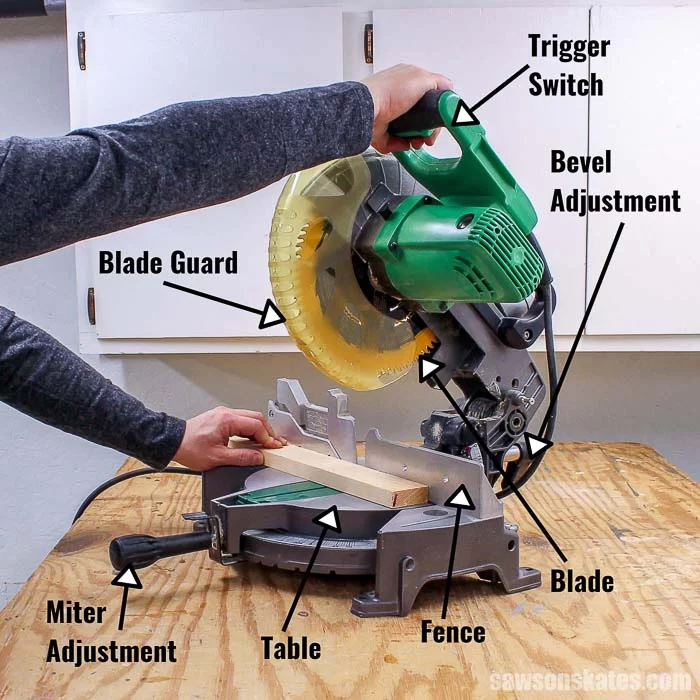
The miter saw is a versatile power tool primarily used for making precise crosscuts and angled cuts in wood and other materials. Its rotating blade pivots left or right to cut at varying angles, enabling craftsmen to create perfect miter joints essential for framing, molding, and woodworking projects. Familiarizing yourself with the saw’s components—such as the bevel adjustment, miter scale, and fence—is critical before attempting angled cuts. Recognizing how these parts work together allows you to set the exact angle needed and achieve consistent results.
1.1 Types of Miter Saws
There are different models including basic miter saws, compound miter saws, and sliding compound miter saws. Each offers various functionalities that influence your approach to angled cuts.
2. Preparing Your Work Area and Tool for Angled Cuts
Proper preparation ensures accuracy and safety when making angled cuts with a miter saw. Clear your workspace of debris and ensure adequate lighting. Securely clamp the material to the saw’s fence to prevent movement during the cut. Inspect your blade for sharpness and cleanliness as dull blades can cause rough cuts and safety hazards. Additionally, review your saw’s angle adjustment mechanisms and test their responsiveness to ensure smooth operation. Taking these steps minimizes errors and helps protect you throughout your project.
2.1 Organizing Your Materials
Measure and mark your wood carefully before cutting, using a pencil and square to guide your angled cuts precisely.
3. Setting the Angle and Positioning the Material
To cut an angled miter, unlock the saw’s miter gauge and rotate the saw arm to your desired angle, typically ranging from 0° to 45°. Use the saw’s built-in angle indicators for accuracy. For compound cuts, adjust the bevel tilt as well. Position your wood firmly against the fence and double-check your markings align with the blade path. Ensuring your material is correctly placed prevents miscuts and allows clean, consistent angled cuts.
3.1 Double-Checking Angles
Use an angle finder or digital protractor if you require exact cuts beyond the saw’s default markings, especially for complex joints.
4. Executing Precise Angled Cuts with a Miter Saw
Once everything is set, start the saw and allow the blade to reach full speed before slowly lowering it through the material. Maintain steady pressure and avoid forcing the cut, which can cause binding or kickback. After completing the cut, raise the blade back to the starting position before releasing the trigger. Practicing this smooth, controlled motion improves cut quality and reduces wear on the blade. For repeat cuts, mark the wood clearly and maintain consistent angle settings to ensure uniformity.
4.1 Common Mistakes to Avoid
Avoid cutting on the wrong side of the line and rushing the saw’s motion, as these can ruin your workpieces.
5. Safety Considerations and Best Practices
Safety is paramount when using a miter saw for angled cuts. Always wear protective eyewear and hearing protection. Keep hands clear of the blade path and use clamps instead of holding material by hand. Inspect the saw regularly for any loose parts or damage. Disconnect power before making blade changes or adjustments. Additionally, operate the saw in a well-ventilated area and avoid distractions to maintain full focus.
5.1 Emergency Procedures
Be aware of your workspace’s emergency stop or power cut-off options and have a first aid kit accessible in case of accidents.
6. Tips for Maintaining Your Miter Saw and Improving Results
Regular maintenance prolongs your miter saw’s life and enhances cutting precision. Clean sawdust buildup after each use, lubricate moving parts as recommended, and replace blades when dull. Calibrate angle settings periodically to maintain accuracy. For improved results, consider upgrading to carbide-tipped blades for cleaner cuts and invest in quality clamps or supports to stabilize larger materials. Leveraging these tips from ToolNest can elevate your woodworking projects significantly.
6.1 Accessing Resources and Tools
Explore ToolNest for expert advice, high-quality miter saw accessories, and tutorials to master angled cuts confidently and safely.


