1. Why Tool Bench Organization is Essential
As a DIY enthusiast, I’ve spent countless hours working in my garage, surrounded by tools, supplies, and projects. Over the years, I realized that keeping my tool bench organized wasn’t just about tidiness—it was about efficiency, safety, and making sure I could always find what I needed. A cluttered workspace can lead to frustration, wasted time, and even injuries. That’s when I decided to explore tool bench organization ideas, and let me tell you, it completely transformed my workflow. Not only did I create a functional space, but I also improved my overall productivity.
In this article, I’ll share some of the best tool bench organization ideas that I’ve used in my own space. Whether you’re a seasoned DIYer or just starting to tackle home improvement projects, these tips will help you create a more organized, efficient, and safe workspace. Trust me, a little organization goes a long way.
2. The Benefits of Organizing Your Tool Bench
Before diving into the nitty-gritty of how to organize your tool bench, let’s talk about the benefits. The biggest reason to organize your tool bench is to increase your efficiency. When everything is neatly stored and labeled, you won’t waste time searching for that elusive screwdriver or wondering where you left your hammer. You’ll be able to focus on the task at hand instead of the chaos around you.
Additionally, an organized tool bench is a safer tool bench. A cluttered workspace can easily lead to accidents, whether it's tripping over scattered tools or misplacing sharp objects. With everything in its place, you reduce the chances of making these dangerous mistakes.
Finally, organizing your tool bench will help preserve the life of your tools. When tools are left lying around in disarray, they can get damaged, rusted, or become dull. Storing them properly extends their lifespan, saving you money in the long run.
3. Setting Up Your Tool Bench for Success
The first step in organizing your tool bench is to set up the space for success. This means creating a designated area for everything you use regularly. Whether it’s a heavy-duty workbench or a small mobile station, the key is to make sure you have enough room to work comfortably without things piling up.
When setting up your tool bench, start by ensuring you have proper lighting. I made the mistake of working under dim lights for years, and I found that having bright, adjustable lighting made a huge difference in my ability to see small parts and details. Consider installing overhead lights or a work lamp that can be positioned where you need it most.
Next, think about ergonomics. Your workbench should be at a comfortable height, especially if you plan on standing for long periods. Ideally, you want your work surface to be at waist height. If your workbench is too low or too high, it could lead to unnecessary strain on your back and arms.
4. Tool Storage Solutions for Maximum Organization
Now that you’ve set up your space, it’s time to dive into the tools and how to store them. There are endless ways to organize your tools, depending on your needs and available space. Let me share some of the most effective storage solutions I’ve implemented that have truly transformed my workspace.
Drawer Organizers: If you have a tool bench with drawers, adding dividers or small bins is an excellent way to keep everything in its place. I use small plastic containers to separate screws, nails, and bolts, and it makes it so much easier to find what I need without rummaging through a drawer full of clutter.
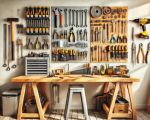
Pegboards: One of the most popular storage solutions for tool benches is the pegboard. It’s versatile and allows you to hang tools within easy reach. I’ve used a pegboard to organize everything from hammers and screwdrivers to pliers and tape measures. The best part is that you can customize the layout to fit your specific tools.
Tool Cabinets and Shelving: If you have larger tools or need more storage space, tool cabinets and shelving are essential. I invested in a rolling tool chest, which is perfect for keeping heavier items like drills, saws, and power tools organized. Additionally, shelving units help store boxes, paint cans, and other bulky items that don’t belong on the work surface.
5. Creative Tool Bench Organization Ideas
While pegboards and drawer organizers are tried-and-true methods, I wanted to get a little more creative with my tool bench organization. Here are some of the unique ideas I came up with:
Magnetic Tool Holders: I use magnetic strips to hold metal tools like screwdrivers and wrenches. These strips are mounted on the wall above my workbench, and it’s amazing how convenient it is to grab the right tool with one hand. It’s also a great way to save space and keep frequently used tools visible and accessible.
Overhead Storage: If you’re tight on floor space, consider utilizing overhead storage. I installed sturdy hooks and shelving above my workbench to store things like extension cords, clamps, and light fixtures. This keeps them out of the way but still easily accessible when needed.
Repurposing Old Items: I love repurposing old items for tool storage. For example, I turned an old spice rack into a storage unit for small tools and accessories. You can also use jars, cans, or even old wooden crates to store screws, nails, and other small parts. The possibilities are endless, and it adds a unique touch to your workspace.
6. Maintaining Your Organized Tool Bench
Once you’ve set up the perfect tool bench organization system, it’s important to maintain it. I know from experience that it’s easy for clutter to creep back in if you don’t make a habit of putting things away. Here are a few maintenance tips that have helped me keep my workspace organized:
Routine Clean-Up: At the end of each project, I take 10–15 minutes to tidy up my tool bench. This includes wiping down surfaces, putting tools back in their designated spots, and sorting through any leftover materials. This small effort keeps the clutter from piling up and makes it easier to get started on the next project.
Regular Inventory Checks: I do a monthly inventory check to make sure all my tools are in good condition and properly stored. If anything is broken or missing, I can address it before it becomes a problem.
Make Adjustments as Needed: As I acquire new tools or start new projects, I often need to adjust my organization system. Be flexible with your setup and make changes when necessary to accommodate your growing collection of tools.
7. Final Thoughts on Tool Bench Organization
Tool bench organization is more than just about keeping your space tidy; it’s about making your work more efficient, productive, and enjoyable. By investing a little time in organizing your tools and setting up your workspace correctly, you can create an environment that helps you focus on what matters most—your projects.
If you’re ready to take your tool bench organization to the next level, visit ToolNest for more tips and solutions that will help you make the most of your space. Whether you’re looking for custom storage options or need guidance on organizing specific tools, ToolNest has everything you need to make your workshop work for you.


