How to Use a Miter Saw for Angled Cuts: A Complete Guide
- Understanding Miter Saws
- Setting Up the Miter Saw
- Adjusting the Angle for Precision
- Safety Tips for Using a Miter Saw
- Common Mistakes and How to Avoid Them
- A Real-Life Example of Using a Miter Saw for Angled Cuts
- Getting the Right Tools at ToolNest
Understanding Miter Saws
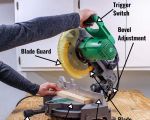
A miter saw is a power tool used to make precise crosscuts and angled cuts, typically on wood. This tool is especially useful for projects that require angled cuts, such as molding, trim, and framing. Miter saws are known for their accuracy and ability to cut clean, sharp angles quickly and efficiently. There are two main types of miter saws: compound and sliding. While both can make angled cuts, sliding miter saws offer additional versatility for wider cuts.
In this guide, we will focus on how to use a miter saw for angled cuts, providing step-by-step instructions and offering tips on ensuring the cuts are precise and safe. Whether you're a beginner or have some experience, understanding how to operate a miter saw correctly is essential for achieving professional-quality results in your projects.
Setting Up the Miter Saw
Before you start making cuts, it's important to set up your miter saw properly. Here’s how to do it:
- Position the Saw: Place your miter saw on a stable surface, such as a workbench or sawhorses. Ensure it is firmly secured to avoid any movement during operation.
- Check the Blade: Ensure that the blade is sharp and appropriate for the material you will be cutting. A dull blade can lead to poor cuts and potentially cause accidents.
- Align the Fence: Adjust the fence of the saw to ensure that your material is positioned correctly. The fence helps keep the material stable and aligned while you make the cut.
- Measure and Mark: Measure your material and mark the cutting line accurately. Use a pencil or marker to draw a clear line where you want to cut. This ensures you know exactly where to make your cuts.
Adjusting the Angle for Precision
One of the main reasons people use miter saws is to make angled cuts. Adjusting the angle correctly is crucial for achieving accurate results. Here’s how to adjust your saw for angled cuts:
- Find the Right Angle: Most miter saws come with an adjustable scale that allows you to set the blade at various angles, usually from 0° to 45°. If you need a specific angle, use a protractor or angle finder to measure it.
- Lock the Angle: Once you've set the desired angle, make sure to lock the miter saw in place. This prevents the blade from shifting during the cut, which could cause inaccuracies.
- Test Cut: Before cutting your actual material, do a test cut on a scrap piece of wood. This will help you ensure that the angle is set correctly and that the cut is accurate.
Safety Tips for Using a Miter Saw
While miter saws are extremely useful, they can also be dangerous if not used properly. Here are some essential safety tips to follow when using a miter saw:
- Wear Protective Gear: Always wear safety goggles and ear protection to protect your eyes and ears from debris and noise. Additionally, wear dust masks if you're cutting materials that produce a lot of dust.
- Keep Hands Clear: Always keep your hands and fingers away from the cutting path. Use clamps to hold your material in place instead of using your hands.
- Check the Blade: Before starting, check the blade for any damage. A damaged blade can be hazardous and lead to inaccurate cuts or kickback.
- Stay Focused: Never rush through a cut. Always ensure you’re paying full attention and have a firm grip on the saw’s handle during operation.
Common Mistakes and How to Avoid Them
While using a miter saw is fairly straightforward, there are some common mistakes that even experienced users can make. Here are a few mistakes and how to avoid them:
- Incorrect Angle Adjustment: One of the most common mistakes is not setting the correct angle. Always double-check the angle setting and test on scrap wood before making the actual cut.
- Not Securing the Material: Failing to properly secure the material can cause it to shift during the cut. This can result in an inaccurate cut and even injury. Always use clamps or a sturdy surface to secure your material.
- Rushing the Cut: Cutting too quickly can lead to mistakes and a poor finish. Take your time to ensure the saw is cutting steadily and accurately.
A Real-Life Example of Using a Miter Saw for Angled Cuts
Let’s say you're working on a home renovation project, installing crown molding in a room. The molding requires precise angled cuts to fit snugly around corners. Using a miter saw for these cuts ensures that the angles are accurate and the molding fits perfectly.
In this case, you’d measure and mark the angles needed for the corners, adjust your miter saw to the appropriate angle, and then make the cuts. With a sharp blade and proper technique, the molding will fit tightly, giving your room a polished, professional look.
Getting the Right Tools at ToolNest
If you’re looking for the best miter saws and accessories for your projects, look no further than ToolNest. They offer a wide selection of high-quality tools that are essential for making precise angled cuts. From miter saws to saw blades and safety equipment, you’ll find everything you need to take your woodworking projects to the next level.
SEO Title: How to Use a Miter Saw for Angled Cuts: A Comprehensive Guide
SEO Keywords: how to use a miter saw for angled cuts, miter saw tips, using a miter saw, best miter saw for angled cuts, cutting angles with a miter saw
SEO Description: Learn how to use a miter saw for angled cuts with this step-by-step guide. Get tips on setup, safety, and common mistakes to avoid. Perfect for both beginners and experienced woodworkers.


