Patching Small Holes in Drywall: A Step-by-Step Guide
As a homeowner, I’ve found myself dealing with small holes in drywall more often than I would like to admit. Whether it's from a nail that was used to hang a picture, an accidental bump, or even the wear and tear of daily life, small holes in drywall are a common issue. Fortunately, patching small holes in drywall is something that can easily be done with a little bit of patience, the right tools, and a bit of know-how.
In this article, I’m going to walk you through the process of patching small holes in drywall. By the end, you’ll have the confidence to tackle this simple home repair project yourself. I’ll break down everything from the tools you’ll need, to the steps involved, and tips for achieving a smooth, professional finish.
1. Understanding the Types of Holes in Drywall
Before diving into the repair process, it's essential to understand the types of holes you're dealing with. The size and nature of the hole will determine how you go about fixing it. Small holes are typically the result of nails, screws, or minor impacts, while larger holes might require a different approach altogether.
For this article, I’m focusing on small holes—those that are no larger than about 1-2 inches in diameter. These are the types of holes that are most often caused by nails, screws, or accidental bumps from furniture. For example, the other day I accidentally knocked a picture off the wall, and it left a tiny hole in the drywall. It’s nothing that a little bit of patching couldn’t fix!
2. Tools and Materials You’ll Need
Before you begin patching, it’s important to gather the necessary tools and materials. Here's a quick list of everything you'll need to complete the job:
- Joint compound (spackle or drywall mud): This is the material used to fill in the hole and smooth the surface.
- Putty knife: A putty knife is used to apply the joint compound and smooth it over the hole.
- Sandpaper or sanding block: To smooth the patched area once it’s dry, you’ll need a fine-grit sandpaper.
- Primer and paint: Once the hole is patched and smooth, you’ll need primer and paint to match the surrounding area.
- Patching material: For very small holes, you can use a pre-mixed spackling compound, which is ideal for minor repairs.
- Utility knife: If the edges around the hole are jagged, a utility knife will help smooth them out.
These basic tools will make your drywall patching project a breeze, and they can be found at any local hardware store. I’ve always found it helpful to have everything prepared before I start, so I don’t waste time running back and forth to the store.
3. Preparing the Hole for Patching
The first step is to prepare the hole for patching. This includes cleaning the area around the hole and ensuring that the surface is smooth. If the hole has rough edges or is jagged, use a utility knife to trim around the edges. You want to create a smooth, clean opening so that the patch adheres well and looks seamless when finished.
Next, if there’s any dust or debris around the hole, make sure to clean it off with a damp cloth. Dust and dirt can interfere with the patching process, making it harder for the joint compound to stick properly. Once the area is clean and dry, you're ready to move on to the next step.
4. Applying the Joint Compound
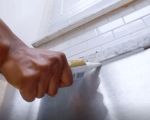
Now it’s time to fill the hole with joint compound. Start by using a putty knife to scoop up some of the compound and spread it over the hole. Be sure to apply a thin layer at first, gradually building it up as needed. It’s better to apply multiple thin layers rather than one thick layer, as thick layers can take longer to dry and may crack over time.
Use the putty knife to smooth the compound over the hole, ensuring that the patched area is level with the surrounding wall. Once the hole is completely filled, use the edge of the putty knife to remove any excess compound, creating a smooth surface. If you’re dealing with a slightly larger hole, you may need to repeat this process until the hole is fully covered and flush with the wall.
5. Sanding and Smoothing the Patch
After the joint compound has dried (usually within 1-2 hours, but check the instructions on the product for drying time), it’s time to smooth the surface. Start by lightly sanding the area with fine-grit sandpaper or a sanding block. This step is crucial for achieving a smooth, even surface. Be sure to sand gently, as too much pressure can cause the compound to become uneven.
Once you’ve sanded the patched area, wipe it down with a damp cloth to remove any dust. Then, run your hand over the surface to ensure it feels smooth and level. If necessary, apply another thin layer of joint compound, allow it to dry, and repeat the sanding process until you’re satisfied with the result.
6. Painting the Patched Area
Once your patched hole is smooth and dry, it’s time to finish the job by painting over the area to match the rest of your wall. First, apply a coat of primer to the patched area. The primer helps the paint adhere better and prevents the patched area from absorbing too much paint.
After the primer has dried, use a small paintbrush or roller to apply a coat of paint that matches your wall color. You may need to apply multiple coats of paint, depending on the color and type of paint you’re using. Be sure to allow each coat to dry completely before applying the next.
I’ve found that matching the wall paint can be tricky, especially if the wall color has faded over time. If you have leftover paint from when the wall was first painted, this is the perfect time to use it. If you don’t have the exact color, try to find a paint that closely matches the existing wall color.
7. Tips and Tricks for Successful Drywall Repair
To ensure your patching project goes smoothly, here are a few helpful tips and tricks I’ve learned over the years:
- Patience is key: Don’t rush through the process. Allow each layer of joint compound to dry completely before sanding or painting.
- Use a light hand with the sandpaper: It’s easy to over-sand, which can create an uneven surface. Sand gently and use a light touch.
- Consider using a drywall patch for larger holes: For larger holes or holes caused by more significant damage, a drywall patch may be needed to ensure a strong, lasting repair.
- Don’t skip the primer: Applying primer before painting ensures the best finish and prevents the patch from absorbing too much paint.
With these tips in mind, patching small holes in drywall should be an easy and effective DIY project. Whether you’re fixing a tiny nail hole or repairing a small dent in your wall, this process can save you money and keep your home looking great.
SEO Title: How to Patch Small Holes in Drywall: A Complete Guide for Homeowners SEO Keywords: patching small holes in drywall, drywall repair, how to patch drywall, fixing holes in drywall, DIY drywall repair SEO Description: Learn how to patch small holes in drywall with this step-by-step guide. Discover the tools, techniques, and tips for making your wall repairs look professional.


