How to Build Custom Furniture with Power Tools: A Complete Guide
Building custom furniture can be an incredibly rewarding project, and using power tools makes the job faster and more precise. Whether you’re looking to craft a bespoke dining table, a cozy bookshelf, or a sturdy coffee table, having the right tools and skills will ensure your furniture is not only functional but beautiful. In this guide, I will walk you through the steps of building custom furniture with power tools, sharing tips, tricks, and a few personal insights from my own woodworking journey.
1. Why Build Custom Furniture?
There are many reasons why building your own furniture can be a great idea. For one, it allows you to create pieces that perfectly match your home’s aesthetic and your personal style. No more settling for generic mass-produced furniture that doesn’t fit your space or taste. Additionally, building custom furniture offers a sense of accomplishment and can be a fun and rewarding hobby.
Moreover, creating furniture with your own hands can be more affordable than buying high-end pieces from stores. Plus, the materials you choose can make your project unique and tailor-fit for your needs. But perhaps most importantly, custom furniture allows you to control the quality, dimensions, and finish of each piece, ensuring it meets your specific requirements.
2. Tools You Need for Building Furniture with Power Tools
Before diving into building custom furniture, it’s important to have the right tools. With the right power tools, your job will not only be easier but more accurate. Below are the essential power tools I recommend for building furniture:
2.1 Circular Saw
A circular saw is an indispensable tool for cutting wood and plywood quickly and efficiently. It can cut through thick boards with ease, and its versatility allows you to make both straight cuts and angled cuts. A good circular saw will help you make precise cuts for your furniture project.
2.2 Jigsaw
A jigsaw is perfect for making intricate cuts, curves, and other complex shapes. If your project involves rounded edges or unique shapes, the jigsaw will be your best friend. It’s also great for cutting through thinner wood or even laminate surfaces.
2.3 Power Drill
A power drill is essential for drilling holes and driving screws. It’s one of the most versatile tools you’ll use when assembling your furniture. Make sure you have a drill with adjustable speed settings to control how fast you work. Additionally, having various drill bit sizes is important to handle different screw and hole sizes.
2.4 Router
A router is used for hollowing out an area in wood or for smoothing the edges of your project. It’s also perfect for adding decorative details such as rounded edges or grooves to your custom furniture. It’s especially helpful for creating professional-looking finishes on your furniture pieces.
2.5 Sander
After the cutting and shaping is done, sanding is crucial for smoothing rough surfaces and preparing the wood for finishing. A power sander can make this process much faster and more consistent than hand sanding. Choose a sander with multiple grit levels for different stages of smoothing.
3. Step-by-Step Guide to Building Custom Furniture
Now that you know which tools to use, let's break down the process of building custom furniture step by step:
3.1 Design Your Furniture
The first step in building custom furniture is to decide what you want to create. Whether it’s a table, shelf, or chair, make sure to consider the size, shape, and function of the piece. Start by sketching your design on paper or using design software. Measure the space where the furniture will go to ensure it fits properly. Once you have your design, create a materials list and decide on the type of wood or materials you want to use.
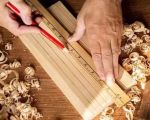
3.2 Cutting the Pieces
With your materials ready, it’s time to cut the pieces. Use your circular saw to make straight cuts and your jigsaw for more intricate shapes. Always measure twice and cut once to avoid mistakes. If your project requires precise angles, use a miter saw or set the angle on your circular saw. Ensure each piece is cut to the correct length and width according to your design.
3.3 Assembling the Pieces
Once your pieces are cut, it’s time to start assembling the furniture. Use your power drill to drive screws into place. If needed, pre-drill holes to prevent the wood from splitting. This is also when your router can come in handy for adding decorative edges. Use wood glue on joints for additional strength, and allow time for it to set before securing the pieces together with screws.
3.4 Finishing Touches
After assembly, it’s time for the finishing touches. Sand the entire piece to remove any rough spots and ensure smooth surfaces. Then, apply a wood finish, such as stain or paint, to enhance the wood’s appearance and protect it from damage. Choose a finish that complements the wood’s natural color and your desired aesthetic. Allow the finish to dry thoroughly before using the furniture.
3.5 Maintenance and Care
To keep your custom furniture looking great, perform regular maintenance. Wipe it down with a damp cloth, avoid placing it in direct sunlight, and polish it as needed to maintain its shine. Over time, you may need to touch up the finish to keep your furniture in top condition.
4. Where to Buy Tools for Building Custom Furniture
When it comes to buying tools, quality matters. Investing in the right tools will not only make your job easier but also improve the final product. Check out [ToolNest] for a wide range of high-quality tools that will help you with your custom furniture projects. They offer everything from saws to drills and routers, so you can find exactly what you need.
Building custom furniture with power tools is an incredibly fulfilling experience. Whether you’re a beginner or an experienced woodworker, this step-by-step guide will help you create furniture that’s both functional and beautiful. With the right tools and a little practice, you’ll be amazed at what you can create.